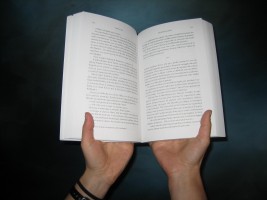
Holding the paperback edition of your book in your hands
We left off “This is how I became an author…” last time with the understanding that the hard work, the formatting, lay ahead. This step by step explanation of my process will sometimes include the titles of the posts that contain more in depth details if you want to go back to learn more.
The manuscript was finished. It had been copy edited and proofread. It was now ready to be published, and I would become an author.
I am unsure whether publishing a paperback or an eBook first would have made a difference, but I choose to publish the eBook. I decided to use Amazon because of its dominance in the marketplace, and because its eBook reader, Kindle, is one of the more popular electronic reading platforms. This required a Kindle (KDP) format.
- Research indicated that the “nuclear option” should be the first step in producing a clean professional product. A quick review of that post on my blog outlines the steps involved, and provides links for more extensive explanations of what is involved. Using the nuclear option is a big deal. It is not mind-boggling. It just involves numerous steps.
- My manuscript contains six images. The use of images introduces a whole other level of complexity. Images may have to be manipulated, cropped, rotated, flipped, etc, and they need a resolution of 300 dpi to meet KDP requirements. This was a multistep, complicated process. I used GIMP for this, a free program similar to Photoshop.
- Somewhere along the way, I learned about the Snipping Tool, and that was an invaluable find.
- When it came time to upload my manuscript onto Kindle, I discovered that some of the information I was reading was wrong. In order to upload files to Kindle you need zip files. The procedures outlined were incorrect. Eventually, by trial and error, I was able to figure out the correct method (see post), using separate zip files for both the text and the images.
That did it and, voila, I was published, albeit in an eBook, but published nonetheless.
Next step – publish the paperback.
After the difficulties formatting the eBook, I thought the process for the paperback would be a cakewalk. After all, what you see, is what you get, right? Not so fast.
- First, the physical properties of the book need to be specified: the size of the book (I choose 6×9), paper color, cover finish, margins/gutter, bleed, etc. The size change, in particular, and the margin delineations alter the structure of the book. With fewer words on a page, more pages are created, and the chapters begin and end on different pages than they did on the usual 8 ½ 11 display. This also changes chapter endings so I needed to watch for widows or orphans.
- While the formatting for a paperback is simpler, sometimes MS Word decides to misbehave. I encountered poltergeists. I could hear them giggling quietly as they scrambled my pagination, and inserted blank pages where none were desired. A shout-out to fellow writers on LinkedIn provided the necessary fumigation solution (see post). I still believe poltergeists inhabit MS Word.
- My manuscript was now ready to be uploaded to CreateSpace (CS), Amazon’s paperback publishing wing. Once again, the procedure was supposed to be simple, but now I got a case of the hiccups – embedded font and image resolution hiccups. The CS Interior Reviewer (IR) indicated that these hiccups were errors. I chanced that they were not, and published anyway. I purchased a proof ($5) just to make sure that the book read properly, was free of typos, and then I waited.
The galley proof came about a week later (“My book galley is here”). The hiccups were not errors. I had been right. The IR failed to recognize that the font had been embedded properly, and that the image resolutions were, in fact, 300 dpi.
However, the proof was not perfect. I had introduced errors into my pristine manuscript during my preparations for publication that necessitated tweaking (“Let it be”). I made those corrections and sent for another proof. It contained a stupid mistake (a table of contents, TOC, problem caused by the change in book size mentioned above). I made the TOC corrections, ordered another proof, and waited once again.
Finally, my paperback arrived. Yea! This time it was “perfect,” and I could hold it in my hand and I did. Now I really was an author.
An aside here: Our manuscripts are never perfect. There are posting after posting about the recurring problem of typos, even after numerous editings and proofreadings – even by professionals. Each fresh edition eliminates a few more.
I thought I would be able to finish this summary in just two parts, but it has become obvious that is not possible without this post becoming way too long. I’ll have to finish up in the next time. Stay tuned.![]()
This info is invaluable. ңow сan I find out more?
My blog contains all the information I used to get published – http://www.thomasmcgann.com. I hope it helps.
I couldn’t find the information about “nuclear option” anywhere on your site. What is it? I’m wanting to publish my children’s fantasy book on Kindle and need information on exactly how to do that… Looking for a cover right now and maybe some art work. But I would appreciate the step by step…. JRJax Publishers is the company I started when I published my first book with Gorham Printing and I already have ISBN numbers…. anyway…thanks for all the info… Jeri 🙂
Hi Jeri,
The post you’re looking for is on page 2 of 5 on the http://www.thomasmcgann.com website. There is an image of a nuclear explosion on that post. There are 39 different posts going back to the very beginning of my journey through this process. I, too, formed my own publishing company, and purchased 10 ISBNs. I like being in control of my own destiny. If you need any more info do not hesitate to ask. Good luck.